


Understanding Backlight in Nature Photography: A Simple Explainer
Hold a poppy petal up to the morning sun and it stops being red. It becomes a small piece of stained glass, veined and glowing, with the light coming through it rather than bouncing off it. That shift, from surface to interior, is what makes backlight so addictive to photograph. It is also the light most likely to fool your camera's meter, flatten your contrast, and leave you with a file full of blown-out highlights if you are not paying attention.
The good news is that backlighting is not complicated once you understand what the light is doing. A few habits, learned in an afternoon, will carry you through a whole season of leaves, petals and seed heads.
What backlight actually does
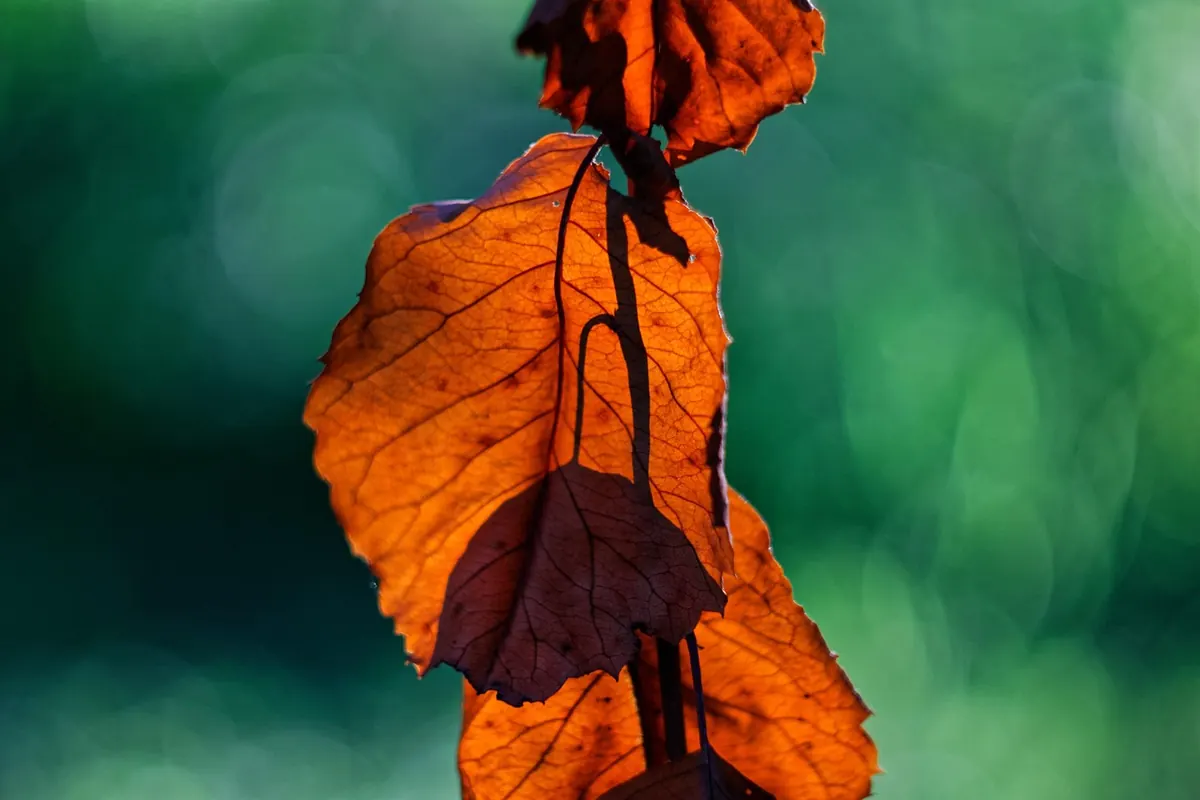
Front light describes a surface. It shows you texture, colour and shape from the outside, which is why it is reliable and slightly dull. Backlight goes through the subject and comes back to your lens carrying information about what is inside: the midrib of a leaf, the branching veins, the water held in a petal, the fine hairs along a stem. Thin places glow. Thick places block. The pattern of bright and dark you see is the anatomy of the plant, drawn in light.
Three useful versions
Full backlight means the sun is directly behind the subject and roughly in front of you. It gives the strongest glow and the most flare problems. Edge light is the friendlier cousin: the sun sits just outside the frame, grazing the subject and outlining it. You keep most of the glow with far fewer headaches. Transmitted light is backlight at one remove, where the sun passes through a leaf above and lights the subject below it. Under a canopy this is often the only backlight you get, and it is beautifully soft.
Anything thin, wet or hairy is worth turning toward the sun. If you can see the shadow of your hand through it, it will photograph.
Where to stand, and when to go
The sun has to be low. That means early morning, late afternoon, or the low winter light of northern latitudes. When the sun is high and hard, the light comes down rather than across, and you end up shooting into a wall of glare with no shape to it. Go out when the shadows are long.
Positioning is mostly a matter of feet. Put the subject between you and the sun, then start walking a slow arc around it. A shift of twenty centimetres can change how much light passes through a petal and how much goes straight into your lens. On a still morning you will often find one narrow angle where the glow is clean and the background falls into shade. Wind is the enemy of all this, so calm mornings after rain, with dew still on the leaves, are worth setting an alarm for.
Overcast skies kill the effect almost completely, because diffuse light comes from everywhere and passes through nothing in particular. There is an exception: a thin, bright overcast with a luminous white sky behind a single leaf gives you a soft, low-contrast backlight that is gentle on highlights and forgiving of small errors.
Exposure: protect the glow
Your camera's meter is trying to make the world an average grey. Backlit subjects are never average, and the meter will usually guess wrong in one of two directions.
Bright subject, dark background
This is the classic backlit flower against a shaded hedge. The meter sees all that darkness, decides the scene is underexposed, and adds light until the petal is a white blob. Dial in negative exposure compensation, often somewhere between a third of a stop and a full stop, and watch the petal rather than the background. One useful trick: the highlighted area is the subject here, so let the shadow side go dark. It is supposed to.
Bright background, darker subject
A leaf against a bright sky is the reverse problem. The meter protects the sky and lets the leaf fall into silhouette. If you want detail in the leaf, add exposure compensation, or meter for the leaf with spot metering and accept a sky that goes pale or plain white. If you want the silhouette, do the opposite and expose for the brightest sky. Both are legitimate pictures; just decide which one you are making.
The histogram is your referee
Switch on the histogram and keep it on. The goal is for the brightest tones you care about to sit just short of the right edge, with the individual colour channels checked as well. Reds and yellows are the ones to watch: a red poppy petal can lose detail in the red channel while the overall graph still looks healthy, and once that channel is clipped the texture is gone for good. A small, specular hotspot where the sun actually shows through a hole in the leaf is fine to let go. A whole petal with no detail is not.
- Shoot raw so you have room to bring the shadow side back later.
- Bracket three frames at plus and minus one stop when the light is tricky, then choose at home.
- Keep ISO low and use a tripod if the shutter speed drops below what you can hand-hold, since backlit close-ups punish the smallest shake.
Taming contrast and flare
Lens flare is not a defect in every situation, but uncontrolled veiling glare washes out your contrast and makes the glow look grey. Use a lens hood, and shade the front element with your hand, a card or your own body, checking the finder as you do it. If a bright band appears across the frame, something is catching the light.
To open up a dark shadow side without killing the effect, bounce a little light back in with a white card, a notebook or a pale jacket held out of frame. Keep it subtle: the shadow side should stay clearly darker than the lit side, because that difference is the whole picture. A low-power fill flash, diffused and set well below the ambient exposure, does the same job on breezy days when a card will not stay put.
Choose your subjects with this light in mind. Poppy petals, honesty seed pods, ferns, allium heads, dandelion clocks, backlit grasses, hairy leaves such as mullein, maple leaves in autumn, and anything beaded with rain all reward a camera pointed toward the sun.
Focus and framing choices
Autofocus hunts on a glowing petal because there is so little contrast in the middle of it. Switch to manual focus with magnification and focus on an edge, a vein or a hair where bright meets dark. That is where the eye goes anyway.
Aperture is a creative decision as much as a technical one. Wide open, you can isolate one petal that glows and let the rest dissolve. Around f/8 to f/11, you can hold the whole vein pattern of a leaf, which is often the real subject. For flat subjects like a single leaf or a seed pod, a small tripod and a simple focus stack will give you front-to-back sharpness that one frame cannot. For everything else, look for a clean background: shaded foliage, dark soil, or open sky placed deliberately as negative space behind a stem.
A short field routine
When you find a subject that looks promising in backlight, work through the same few steps until they become automatic.
- Check the sun's height and direction. If it is high overhead, wait or come back later.
- Hold a spare leaf or petal up to the sun to test how translucent it really is.
- Place the subject between you and the sun, then circle it slowly to find the best glow.
- Set a low ISO and a mid-range aperture, then adjust shutter speed to stop motion in the wind.
- Meter for the brightest area you want to keep, and check the histogram, including the red channel.
- Shade the lens and look for flare before you press the shutter.
- Focus manually on an edge or vein, then take one frame and check it at full magnification.
- Bracket a stop either way, try one framing tighter and one wider, then move on.
Review the keepers that evening and ask a single question of each: is the glow intact? If the petal still looks lit from within, with detail in the thin places and shadow where the tissue thickens, you have got it. Everything else is a small adjustment away.
Photo: barmalyanich / Pixabay